
Let’s be honest, how many times have you opened a record today, clicked “Edit,” waited for the page to load, changed on field, hit “Save,” and then rinsed and repeated on the next record? If that sounds familiar, you aren’t alone. But there is a better, faster way
In Episode 1, we customized and streamlined your Salesforce experience so everything you need is only a click away. In this article, we are going after the clicks themselves.
Although this is an Admin Quick Tips article, any Salesforce end-user can benefit from these tips, especially anyone in a sales or service role who live in Salesforce all day.
In this article, we’ll cover two way to work faster in Salesforce:
- Using keyboard shortcuts
- Editing records with inline editing
We have some great videos posted throughout this article from CRM Bestie. Give her a follow and let her know we appreciate her great content and support for the Salesforce community.
- TikTok: https://www.tiktok.com/@crmbestie
- Instagram: https://www.instagram.com/crmbestie
Why Speed Matters
A few seconds here and there doesn’t seem like much, but if you are a sales rep updating a dozen or so opportunities after a pipeline review, or a service agent working through a queue of cases, each second adds up fast. The good news? Each of these features is available in your Salesforce org, so let’s show you where to look.
Keyboard Shortcuts
Keyboard shortcuts let you search, edit, save, and close records without ever needing to touch your mouse. They work in Lightning Experience apps, and they come turned on. But even if they are turned off, it is super simple to turn them back on.
In my opinion, here are the ones every user should know:
| Shortcut Action | Windows | Mac |
| See all available shortcuts | Crtl + / | Cmd + / |
| Jump to search bar | / | / |
| Edit the record you are viewing | e | e |
| Save your changes (the cursor needs to be in the field) | Ctrl + s | Cmd + s |
| Close a window or cancel | Esc | Esc |
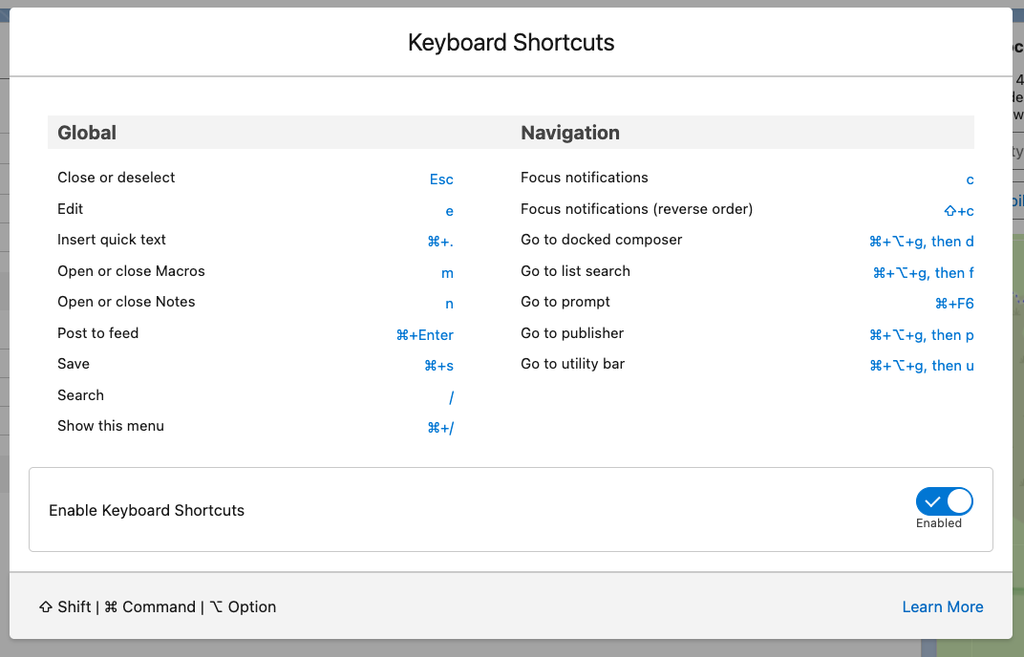
If you only remember one, make it the first. Pressing Ctrl + / (Cmd + / on a Mac) opens the menu of all available shortcuts. So if you remember that, you’ll never have to memorize the entire list. But I am confident, the more you use shortcuts, the less you’ll visit that menu.
Here is what that menu looks like:
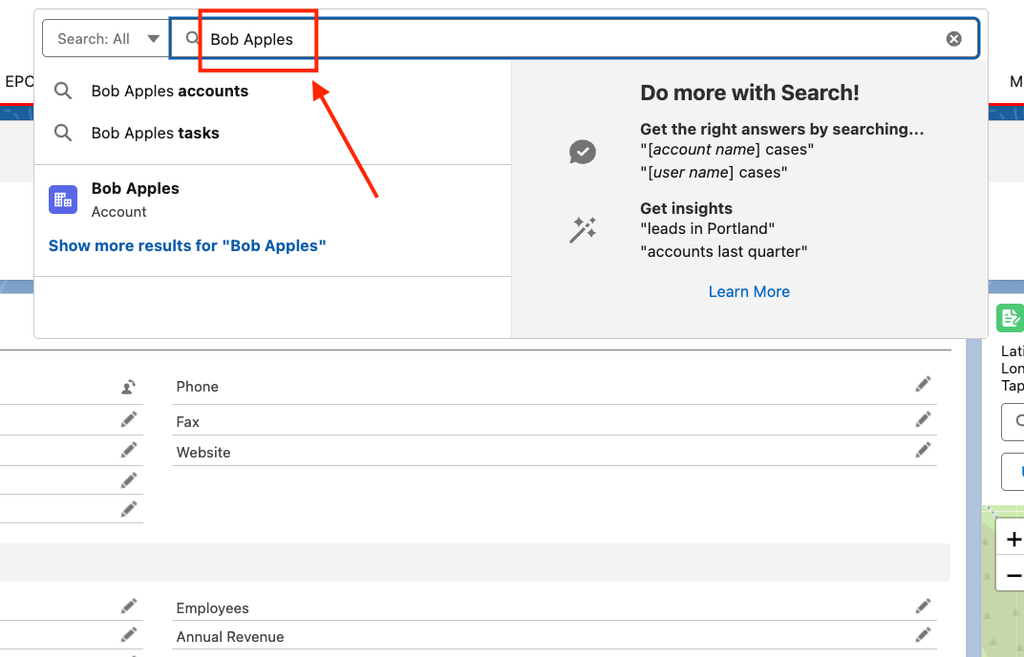
This is what a mouse-free update looks like in practice:
Press / to jump to the search bar, type the name of your record, and press Enter. I promise I only used shortcuts for the following images.
Open the record and press ‘e’ to open edit mode.
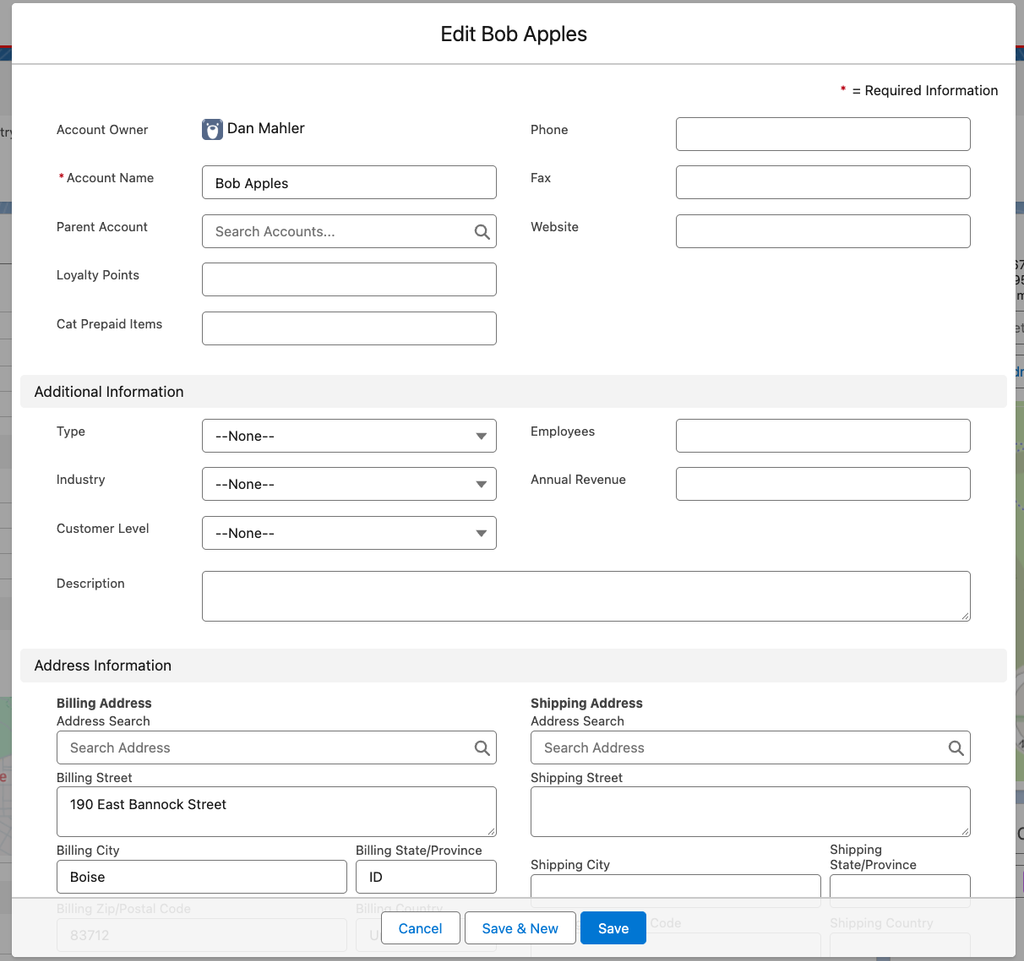
Update your fields. For a true, no mouse experience, you can use Tab to move between fields. Then press Ctrl + s (Cmd + s) to save.
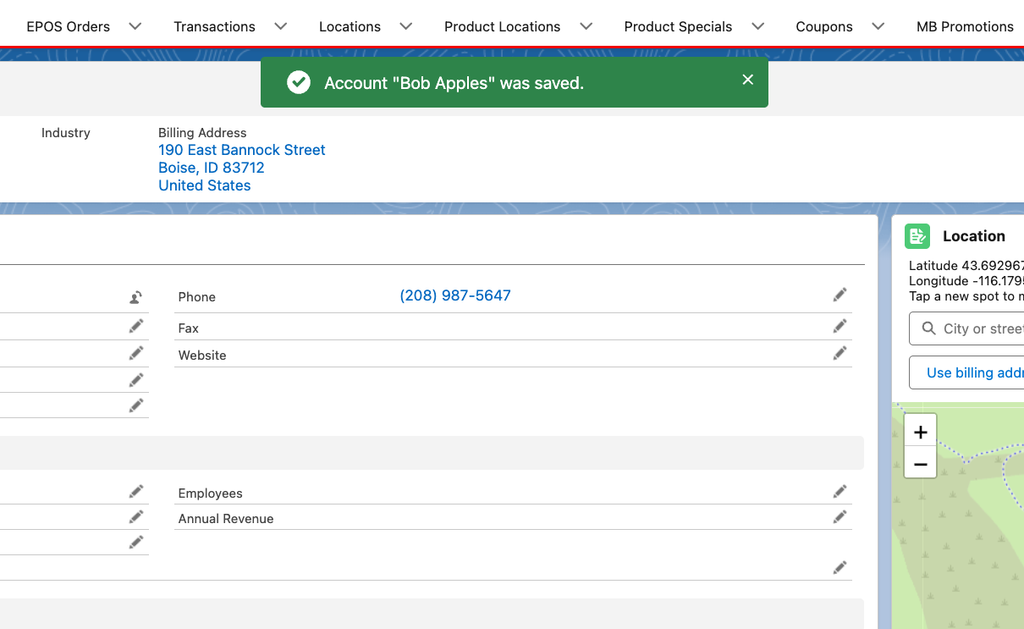
That’s it! You just updated a record without touching your mouse. Want to see it in action? Click the image below to check out CRM Bestie’s video walkthrough:
****[Navigation / User Tip.: Keyboard Shortcuts]****

Some things to keep in mind:
- The ‘e’ shortcut won’t work on Lightning Knowledge articles, reports, dashboards, feed items, approval requests, or email messages.
- Shortcuts can’t be customized
- If you work in a console app, you have more shortcut options available to you.
Pretty handy, huh? Next, let’s skip the edit screen altogether.
Inline Editing
As you may know, inline editing lets you change a field right where you see it, without opening the separate edit screen. You can use inline editing on a record page and in list view, which is where it really shines.
Inline editing on a record
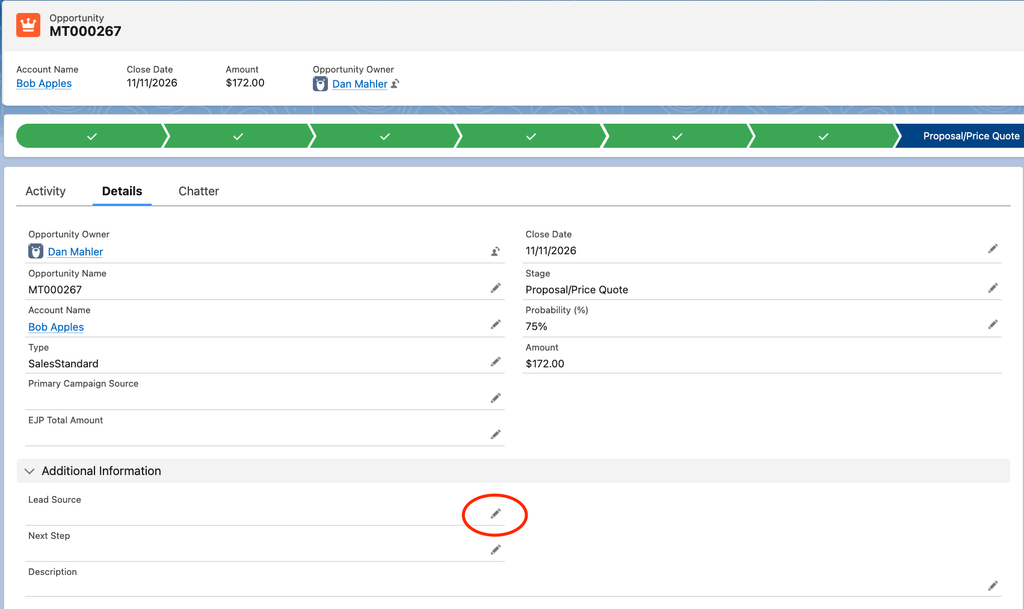
Open the record you want to update (we’ll use an Opportunity as an example). Look at the field you want to edit, do you see a pencil icon? If so, the field is editable. Double-click the field or click the pencil icon.
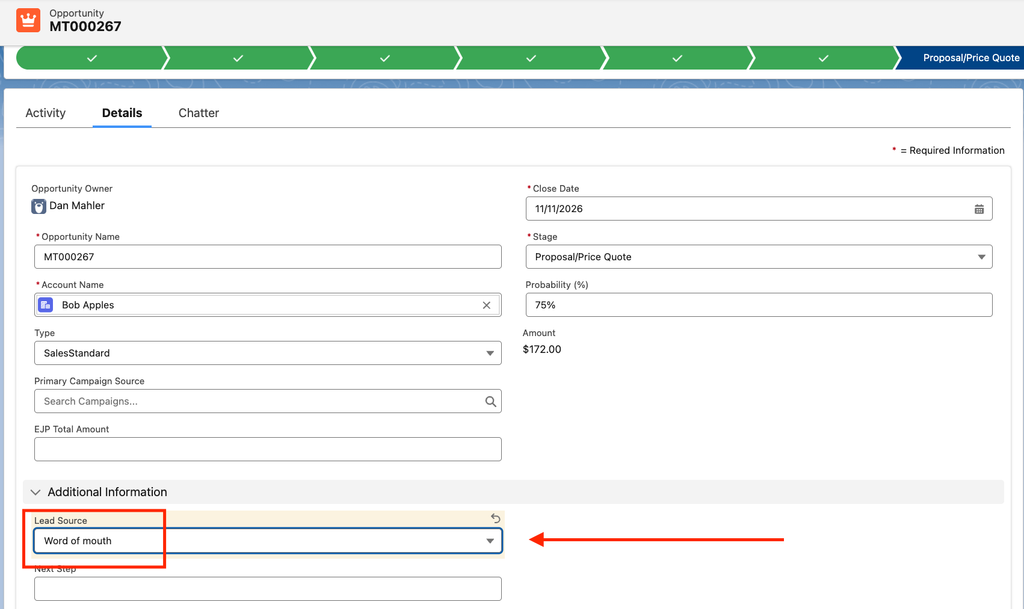
Make your change. Or update as many fields as you would like.
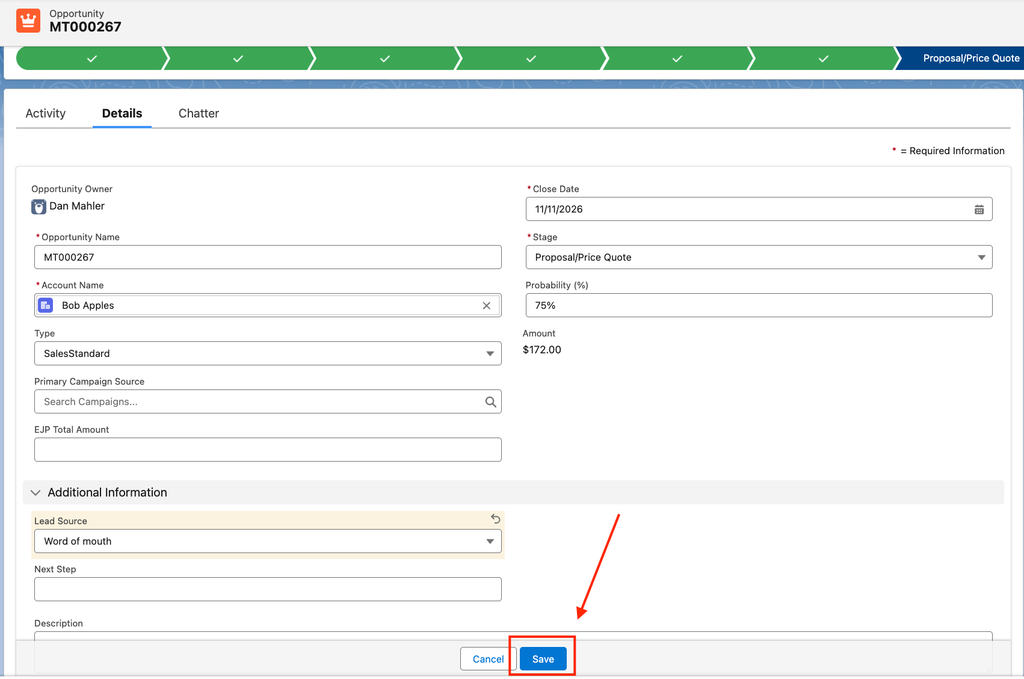
Click ‘Save’ (or use Ctrl + s/Cmd + s, since you know that now 😉).
Helpful Hint: If you see a lock icon instead of a pencil, that field can’t be edited. More on that in a bit.
Inline editing in a list view
This is the one that saves the most time, by and large. Instead of opening ten records to update one field on each record ten times, you can do it all from one screen.
Open your object (we’ll use Opportunity again) and choose a list view (All Opportunities, in our example). Tip: if you pinned your favorite list view after Episode 1, you’re already there.
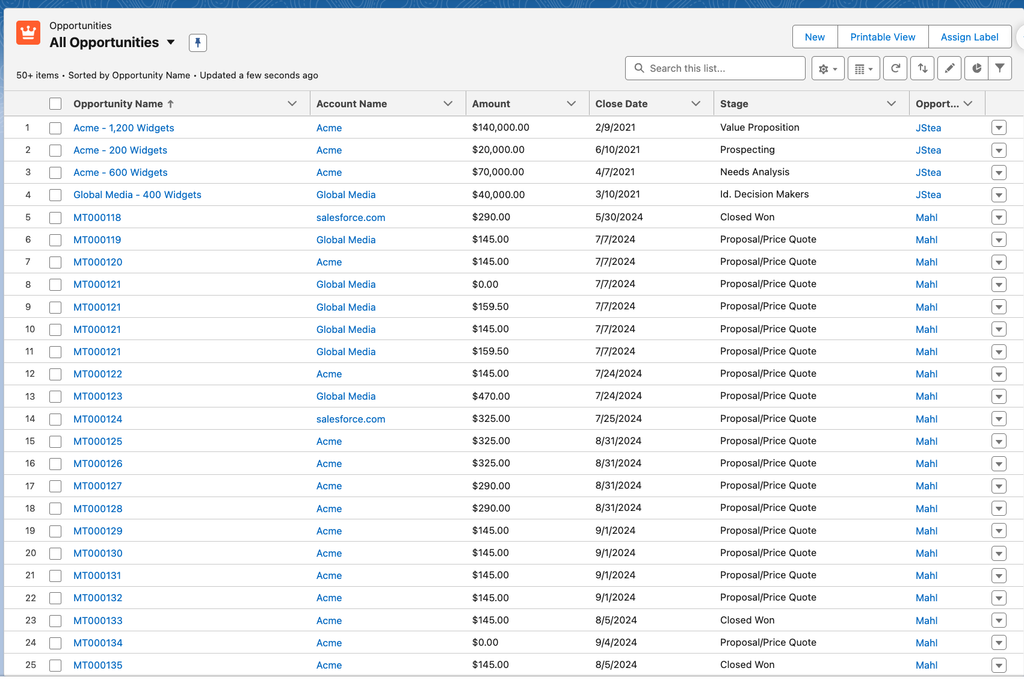
Hover over the cell you want to change and click the pencil icon.
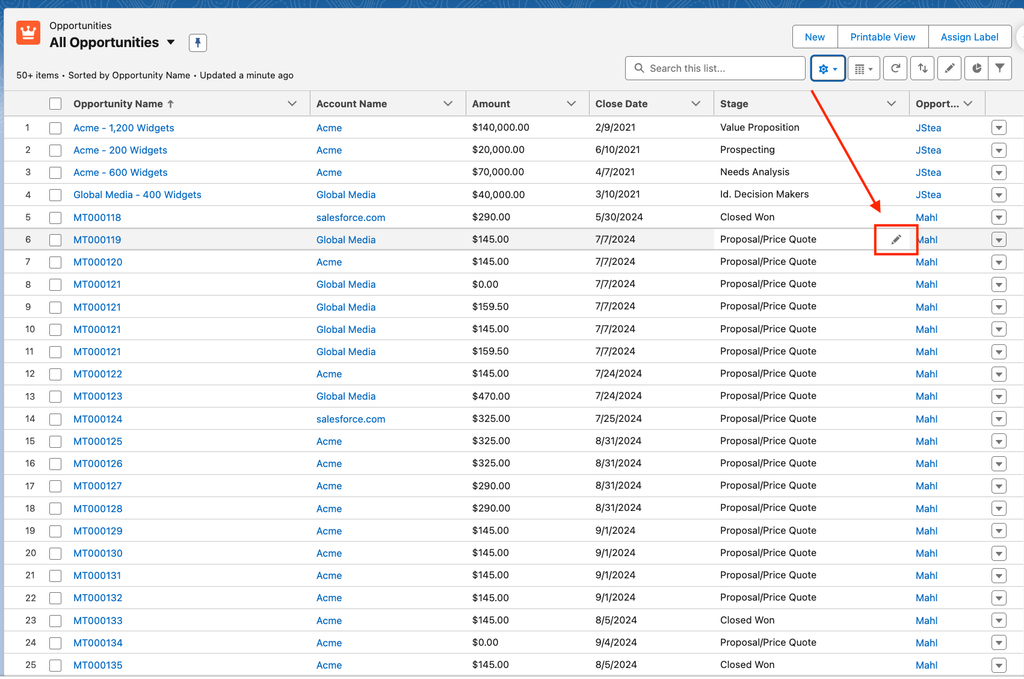
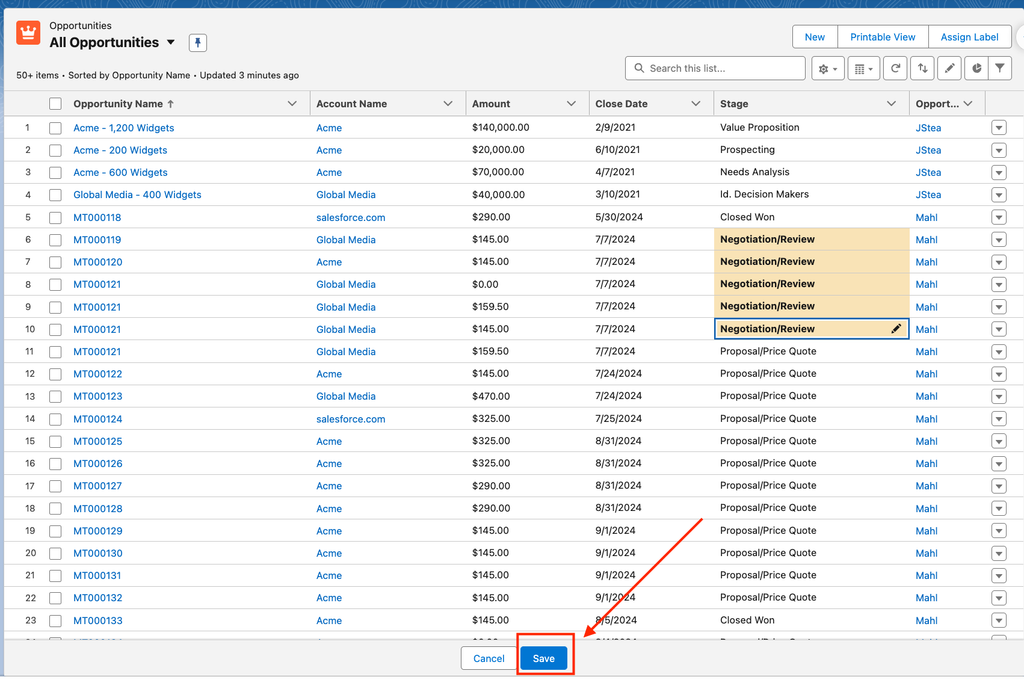
Type your change and press ‘Enter’ or select your new value (as shown in this example). You can move around the list with ‘Tab’ and the arrow keys and keep editing. Or you can click the pencil icon on a new line and keep editing.
When you are done, click ‘Save’ at the bottom of the list.
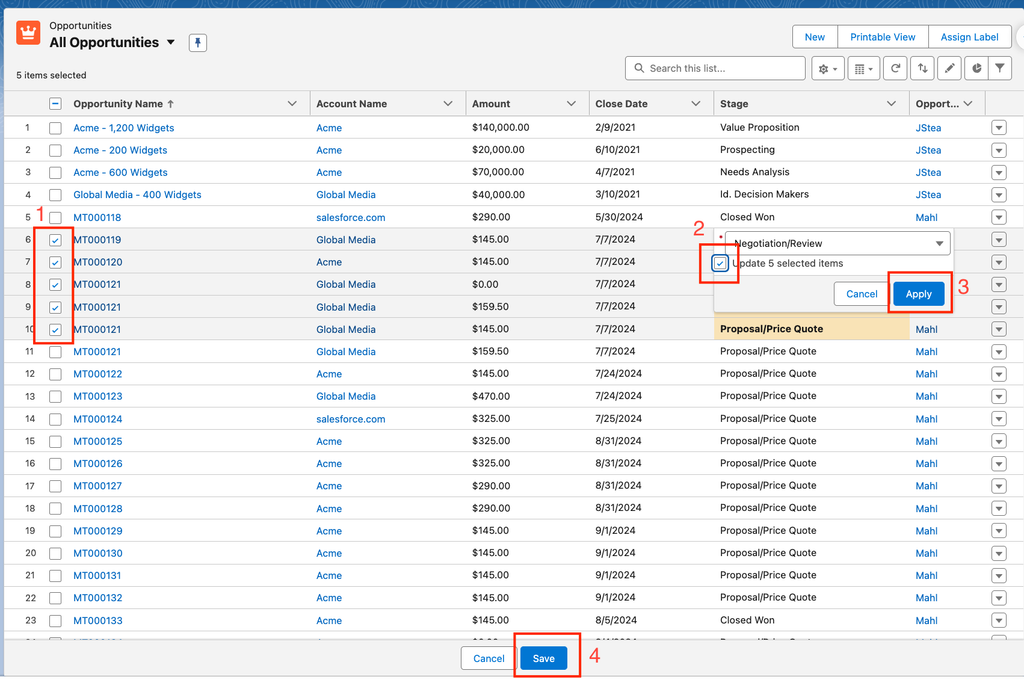
Need to make a change to several records?
- Select the checkboxes next to the records
- Edit the field on one of the records and check the box that says ‘Update [#] selected records’
- Click ‘Apply’
- Hit ‘Save’
CRM Bestie has a great video walkthrough for this one too!
****[Navigation / User Tip: Inline Editing]****

When Inline Editing Isn’t Available
So what if you see a lock icon or no pencil at all? Here are the usual suspects:
- The field can’t be edited by anyone. Formula fields, auto-number fields, and system fields like ‘Created By’ are read-only.
- You don’t have access. You can only edit records and fields you have access to. If you can’t edit the field on a record, you can’t edit it in a list view edit.
- The list view mixes record types. This one can be a gotcha. By default, inline editing in a list view only works when every record in the list has the same record type. Add a ‘Record Type’ filter to your list view, and the pencils should be back.
- The list view uses ‘Or’ filter logic. Inline editing isn’t available on list views with this logic type.
- Your rules still apply. Required fields and validation rules still run when you save, so if something won’t save, look at the error message. It will usually tell you what’s missing.
Admin corner
- Inline editing setup can be found under User Interface Settings: ‘Enable Inline Editing’ & ‘Enable Enhanced Lists’
- New in Winter ’27, the same setup page has two additional settings that allow for editing list views with multiple record types: ‘Make inline edits in list views with multiple record types’ and ‘Remove list view inline edit dependencies on page layout’
- If your users keep hitting the record type issue we talked about above, take a look at these new settings. Neither will give anyone access to fields they can’t already edit.
Bonus speed tip
The App Launcher (the waffle icon in the upper-left corner) has its own search bar. Start typing the name of any app or object and you can jump straight to it. Even it it’s not on your nav bar. CRM Bestie shows you how:
****[Navigation: Using the App Launcher]****

Things to Remember
- Press – Ctrl + / or Cmd + / to see all available shortcuts
- A pencil icon mean editable, a lock means it isn’t
- If two people inline edit the same field at the same time, only the most recent save persists
The Wrap
There you have it, two simple ways to spend less time clicking and more time getting the work done. Try one shortcut and one list view edit today to see how it feels. Future you will thank you.
If you’re looking for more way to improve your workflow, check out our other articles.
Next up: we’re going deeper on list views, including how to build your own and how to turn on into a Kanban board.
Follow CRM Bestie:
- TikTok: https://www.tiktok.com/@crmbestie
- Instagram: https://www.instagram.com/crmbestie